Fall

Tuesday, December 4, 2012

GRANDMOTHER'S LIBRARY: Yentl the Yeshiva Boy

Yentl the Yeshiva Boy 

by Antonio Frasconi

After I discovered that Barbara Streisand's movie, Yentl, was based on a book, I decided I wanted to read it.  The movie actually follows this short 58 page novel well, with a little poetic license thrown in.

Yentl is a girl living in a time when girls were not allowed to study. Her father allows her to study with him, but when he dies, she is afraid she will have to give that up.  She decides to cut her hair, dress as a boy, and join a yeshiva so that she may continue to study the scriptures.

Along the way, Yentl, who has now changed her name to Anshel, meets and falls in love with Avigdor, another yeshiva student.  Yentl's lies become more complex as she devises a plan to 'marry' the woman that Avigdor loves in order to remain close to him. 

The movie remains true to the book in that Avigdor is not allowed to marry his true love because his brother committed suicide; however, in the book, Avigdor marries a widow and is extremely unhappy.  When Yentl finally can no longer live the lie, she reveals herself to Avigdor, who loves her back.  However, Yentl wants to remain a yeshiva student and could not do that if she married.  She sends divorce papers to Hadass, her 'wife,' who never knows what has happened: it remains a mystery to the village. Avigdor divorces the mean widow and marries Hadass. Avigdor and Hadass live happily ever after, naming their first son Anshel.

This is an easy, quick book. I read the whole book while sitting in the waiting room of the doctor's office.
I recommend both the book and the movie.


Monday, December 3, 2012

GRANDMOTHER'S SEWING ROOM: Pillow Cases

 I have been making these fun pillowcases for a while now.  I just need to remember to  blog sometimes!
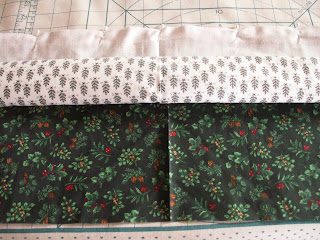
These are so fun and easy to make. You start with 3 pieces of fabric, each the full width of the material.  The top of the pillow case requires a 10 inch piece, the bottom is about 28 inches, and the contrasting strip is only 3 inches.

Begin by laying the 10 inch strip right side up on your ironing board or table.  Iron the 3 inch strip in half the long way, right side on the outside.


Place this strip with the fold side down across the length of the top of the pillowcase.
Then put the pillow body fabric on top, right side down.  Pin the three pieces of material across.

 For whatever reason, the edges never match up, but that is ok. I always keep the first side together and just pin to the end no matter how the width ends up. This is trimmed when you sew it all together.


Take the pillow case body fabric and roll up. This will be wrapped up with the 10inch piece.

Then fold the bottom edge of the 10 inch piece up over the roll of the larger fabric and match the edges.
Then re-pin all the way across.

This fabric roll is why some people call this the burrito or taco method of making the pillow case.


 Sew across the top being careful not to catch the fabric roll other than across the top edge that has been pinned.  When sewn, pull that fabric roll out the end.
 You end up with a beautiful pillow case with all the seams hidden inside the rolled part.  Iron this then fold in half length way.

 NOTE: I do NOT match the edges.  I pin together where the shortest piece ends on the one side. The remaining will be cut off when I surge it.  I really need to take a surger because about the only thing I use my serger for is to make pillow cases. I know there is more out there than can be done!


If sewing, you can trim now.  I use the serger down this side which does the trimming for me.
 I round the corner. There is no reason for this. I have no idea why I do it, other than I like to.  I only round the corner on the selvedge side, not on the folded side. Again, no reason why; that's just the way I do it.

I then iron again and have a finished product.
I make these to match my quilts.  I make them for holidays (I used glow in the dark skeleton fabric for Halloween pillowcases).
Sometimes I piece the top 10 inch piece using the block that is in the quilt I am matching.  I often embroider on the top to personalize them.  As you can see, these are fun and easy to assemble. And they make wonderful gifts.
 Here's a link to some of the other pillow cases I've made.

Sunday, December 2, 2012

GRANNY'S KITCHEN: Jerkey

 Deer season is our favorite time of year because of the wonderful jerky that we make.  There is nothing better than the sweet aroma of jerky curing floating through the house on a cool fall day.  Mouths water in anticipation, and parents scramble to find new hiding places for the fresh snacks so that they last more than a couple days!
 Some people use a dry rub jerky seasoning.  I prefer soaking my meat in a marinade before jerking it. My mixture consists approximately the following ingredients:
1 1/2 cups worcestershire sauce
1 1/2 cups soy sauce
2 tsp or so liquid smoke
2 tablespoons brown sugar
1 tsp garlic powder
1 tsp black pepper

I lay my pieces out in the Tupperware Season-Server container. I have THREE of these and use them all! Of course I've had mine for 20+  years, but I see that they still have them.  Well worth the investment!!  The meat needs to soak overnight.  When my dehydrator is full, some of the meat stays soaking in the fridge for a couple days.  I then spread the meat out on my dehydrator trays. I have the Ronco 7 tray food dehydrator and sometimes I borrow my mother's dehydrator so that I can make my jerky in 1/2 the time.  Yes, I make that much! If my mom did not own a dehydrator that I could borrow, I would definitely invest in a 2nd one for myself.
Once the meat is spread out on the trays, I sprinkle different seasons on the jerky pieces before drying.  This varies depending on what I have on hand, but includes the following:
  • My homemade cajun seasoning 
  • Tony's
  • white pepper
  • lemon pepper
  • black pepper
  • taco seasoning
  •  Chili seasoning
  • BBQ seasoning
  • McMormick's steak rub
  • Italian seasoning
  • store bought cajun seasoning
  • french fry seasing
 As you can see, I use whatever I have on hand and whatever strikes my fancy.  I like them all!  My family's favorites are the taco flavored, lemon pepper, Italian (they call it the jerky with the 'grass' on it) seasoning, and cajun flavored.

This year I have started putting each of the trays in little jars. I liked mixing the flavors up, but my daughter wanted to keep the flavors separate.  Another reason why I put in jars is because last year, my kids left the jerky container in reach of the dogs; dogs can open Tupperware!! Who Knew??? 
So.. individual jars it is!! Plus, it makes it easier to hide the small jars: we just put a few of them up for later.

I have tried different jerky recipes over the years, but this is my tried and true favorite.

GRANDMOTHER'S SEWING ROOM: Advent Calendar

I wanted to make something special for Nathan his 2nd year away from home at Christmas.  I decided to make an advent calendar.  I found the embroidery designs on DesignBySick site, and thought it would be fun to have Nathan get a tiny gift daily till Christmas.
 These are some of the individual designs.  There are 24 different ones.  I sewed onto felt, then made a felt background to sew the pockets on.  I made tabs with large buttons at the top and had a dowel rod for it to hang on. The dowel rod, however, did not get mailed as it was a bit too long.
It was fun filling up the pockets. I 
wish I could have put a different gift card into each pocket, but that would have been too costly for me.  I did, however, get one from McDonalds, one from Taco Bell, and one for Red Robin and put in 3 of the pockets.  If I had remembered before mailing, I would have ordered a couple from Restaurant.com.  There are usually some pretty good deals on there. Some of the things I included in the pockets are:
  • Gift cards
  • sticky notes
  • packs of gum
  • tic tacks
  • tiny plush animal
  • breath mint strips
  • chocolate coins
  • tiny bottle (I thought he could save sand from 'The Sound' in it as a keep sake.
  • Yoo Hoo drink mix (could have been any of the 'straws' that you mix in water)
  • little hand sanitizer
Anyway, now (if he brings it home! lol) he will have a keepsake that he might fill up for someone next year, or we might fill up and send to his brother who will be away on a mission.  I hope it is something he can keep and use with his own family someday.

Monday, April 16, 2012

GRANNY'S KITCHEN: Easy Quiche

I love easy dinners!  And when given free fresh eggs at church today, I decided I wanted to make something with eggs.  I wasn't in the mood for a scrambled egg sandwich, so I decided to make a quiche.
After doing a quick we search, I found a recipe here.

Preheat oven to 400.  Spray a pie pan with oil.
Then I layered in a drained can of mushrooms and diced 1/2 onion. I topped that with a generous cup of shredded Monterry Jack cheese.

In a separate bowl, I whipped up 4 of the eggs, a cup of Bisquick, 2 cups milk, and some salt and pepper.  This I poured on top of the goodies in my pie plate and popped in the oven for 38 minutes.

YUMMY!! 

You can layer anything you want under the cheese.  Maybe next time I'll do a spinach and mushroom quiche!  Looking forward to trying this with different goodies mixed in.

Saturday, April 14, 2012

GRANDMOTHER'S LIBRARY: "Everliving" by Christina Dudley

I sure do enjoy my Kindle Fire!  I get onto Amazon periodically and download free books!  "Everliving" is one of my free finds on Amazon.  This is a 'tragic' love story that takes place in California in an old logged out Redwood forest (or should I say where an old Redwood forest used to be?).

Daphne Linstrom lived in the 1800s and loved the mighty redwoods.  She loved them so much that she became their 'protector' and lived on (as a ghost) for decades after all but one had been logged.

Ben Platt is a graduate student who stumbles across the town where Daphne had lived and not only finds her one remaining redwood, but also 'see's and falls in love with (the ghost of) Daphne!

The book describes what is found in the canopy of a redwood!  I had no idea that other 'forests' or 'worlds' actually existed in the top of a mighty tree!  I just pictured branches, stems, and leaves.  Apparently the branches get so thick as to create a 'forest floor' high in the canopy in which other plants can grow and thrive.  Wow!  Makes me want to take a botany class in California just to study redwoods!

This paranormal love story sounds as if it will be a mush, gushy book, but it really is a great mystery!  Daphne had disappeared a hundred years ago, and this mystery was still alive and creating tourism in her home town of Red Gap.  There are many speculations as to what happened to her, but it is Ben who actually discovers her secrets.

This was a GREAT book to read!  And more doubly enjoyable because it was FREE. Amazon rotates different books to offer as freebies and I happened to catch this when it was free.  The book can be purchased for a nominal price (around $3) for a Kindle, or it is available to read as a 'regular' book found here at Amazon.!  Eiether way, it was an enjoyable find.

Thursday, April 12, 2012

GRANNY'S KITCHEN: small Angel Food Cake


After making my Tiramisu (found here), I had 6 egg whites that needed to be used.  I didn't want to make meringue, but didn't want the egg whites to go to waste.  I searched the web and found Cookie Baker Lynn's blog (found here) which had a 6 egg solution: a small angel food cake!


6 egg whites
1/2 tsp cream of tartar
1/8 tsp salt
6 Tbsp sugar
1/2 cup minus 2 T flour
1/2 tsp vanilla extract
1/8 tsp almond extract
1/2 cup flaked coconut

Beat the eggs with the cream of tartar and salt.  Add the sugar a tablespoon at a time. Beat until shiny and stiff.  Pour into an 8" square pan.  I did not grease the pan, but will try greasing it next time.
I had some leftover coconut from my Easter Basket Cookies (found here).  That's why the green.. It made it festive!  If I had planned this out, I could have gotten creative with chocolate bunnies and jelly beans for decoration.  Next time!
This is also pretty with just white coconut as you can see from Cookie Baker Lynn's Blog post..
And this is much easier than the Angel Food cakes I remember my mother making!

Monday, April 9, 2012

GRANNY'S KITCHEN: Tiramisu

Ever since I saw the Cake Boss Episode where Sonny made a Tiramisu, I have been wanting to try this!


Here is my version of his Tiramisu.
 First, I mixed 6 egg yolks with 1 1/4 cup sugar.
I improvised a double boiler by doubling up a couple sauce pans.  I stirred and cooked my egg yolk/sugar mixture over boiling water for 10-15 minutes until it was creamy and yellow.  Then took it off the heat.


 After this was done, I added a pound of Marscapone cheese plus 1/4 cup cream cheese and stirred until melted.

I then folded in almost 2 cups of Cool Whip.


The recipe calls for lady fingers.  I actually used Milano double chocolate cookies in place of one box of lady fingers.  And to give a touch of authenticity, I used a box of lady fingers, too.

 I used my small spring form pan and put a ring of frosting around the inside to hold the cookies in place.  (There was STILL frosting from my original Super Bowl strawberry football project and my Easter Basket Cookie  project. )  I then snapped part of the lady finger cookies off to make them fit the side of the pan and alternated Milano cookies and lady fingers around the pan.  .


I then put the rest of te Milanos on the bottom of the pan and filled in the rest of the space with lady fingers


The recipes all call for either coffee or coffee flavored liquor.  Since I don't drink either, I had no idea what to get.  I decided to go with the coffee flavored liquor because the flavored is probably not coffee, and the liquor will evaporate.  :)

Anyway, I had the salesman point me to the coffee flavored liquors and the name "Kahlua" sounded familiar, so that is what I bought.  Not sure if a coffee flavored liquor and rum with coffee flavor are the same, but it is what it is. I bought the smallest bottle available (which looks like it will make 2 or 3 Tiramisu pies!  Take 1/3 cup of this and using a basting brush, brush this onto the lady fingers and Milano cookies.  I used a little over 1/2 of my third cup for the first layer, because I had to brush on the sides and the bottom. 


Then pour about 1/2 the filling mixture in the pan and layer with the rest of the lady fingers. Brush these with the Kahlua, too, then pour the rest of the filling on top.  I may have poured too fast, no idea. But for some reason my lady fingers tried to rise to the top.  I gently pushed them back down with my finger then placed my Tiramisu in the fridge for a few hours.  This could be made the day before, because it does need time to set up!  As you can see, I didn't quite allow mine to set long enough: we were anxious to dig in!

When finished, sprinkle some cocoa powder on top.  I would use some kind of stencil next time to make it prettier.  One recipe recommended chocolate curls as a garnish.  My chocolate 'grated' rather than curled as you can see.

Take a knife and cut around the pan to get the frosting from the side and take off the side.  The cake boss put a ribbon around his, and I would have done so if I'd had one -- it would hide the frosting line. 


I will probably make this again just to get the Kahlua used up! lol  I didn't taste it, I don't think.  If so, it was nicely blended into the rest of the ingredients so that there was no alcohol taste to this and really no coffee taste.  It was a pleasant flavor and easy enough to make that I won't hesitate to make this again.
GRANNY'S KITCHEN: Easter Basket Cookies

 I found these sugar cookies at Aldi's and thought they would make a nice cookie basket.  There are 24 pieces: just enough for each of the 24 places in my mini muffin tin holder.
I generously sprayed my muffin tin with the spray oil.  I then took one piece of cookie dough and smashed down into each of the holes. Before the time was up baking, I pulled out and pressed down just a bit (it was like 'popping' balloons -- the cookies deflated so they were still basket shaped rather than balls of cookies.
While these were baking, I took about a cup of coconut (I just used what was left in a bag in the freezer) and added a few drops of green food coloring and water.  I shook up to make green coconut for the Easter grass.
Believe it or not, I still had frosting left in the can from my football strawberry project.  I squirted some of this in each basket (after they were cooled) then pushed some of the green coconut Easter grass onto each cookie.  Jelly Beans (slued down with frosting, too) completed the look. 
The lighting in my photo is off (wish I hadn't used the flash!), but here is the finished project.  

Thursday, March 22, 2012

FRUGAL GRANNY: Homemade Dishwashing powder

My cousin gave me a call and said she had discovered the BEST EVER dishwasher powder.
As I happened to have the ingredients on hand, I gave it a try.


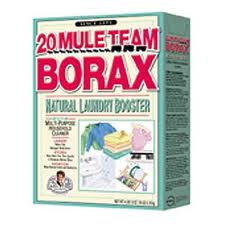
I had Borax and Washing Soda on hand from my homemade laundry soap (found HERE)..

You mix 2 cups Borax with 2 cups Washing soda and add 6 tablespoons of Citric Acid.  (I keep this on hand for when the kids have colds and for canning.. I think it runs about $10 a pound, but I cannot tell you how big a pound is.. but it would be more than enough!)   Then you fill the rinse agent container with vinegar.


My cousin said that this gets hard after the first night so do NOT mix in a jar!!  I just put in a gallon size zip baggie.  The next day, you crumble it up and is fine after that.  If you have it in a jar, you have to crumble out with a knife or something.  She said after the first time it gets hard and you crumble it up, it does not get hard again.  No idea why this would happen, but it would probably be safe to put in a jar after you crumble it up.
Another thing you can do is to add lemon oil.  She doesn't do this, so I didn't either.  But that might prevent the clumping that first night??

My cousin says that she NEVER 'pre-washes' her dishes!!  THAT would be nice!!  My poor dishwasher was getting so bad that I needed to rinse the dishes before putting them in there, and I figure if I take the time to rinse, I might as well add some soap and they'd be clean! I have to agree that I do NOT want to wash my dishes before putting in the dishwasher!!  I will see how this goes.. my daugher had cream of wheat this morning for breakfast and I put the bowl (OK, I rinsed it a bit!!) in the dishwasher to see if it passes my 'test.'

Tuesday, March 20, 2012

GRANNY'S KITCHEN: Baked Reuben Sandwiches

Betty Crocker has given me another idea for a great sandwich.  HERE is the link to her wonderful baked reuben sandwich recipe.  I tweaked it a bit to fit my kitchen.

Since I keep a supply of home canned corned beef in my pantry, I used some of that rather than buy deli corned beef.
And I use the baking mix from Aldi's.
So...

Mix 2 cups baking mix, 1 cup milk, 1 egg, and 1 tsp caraway seeds.  Put about 1/2 of this in the bottom of a greased 8x8 pan.
On top of this, I put about 1/2 pint shredded corned beef and just drizzled some mustard over the top.  I then layered with 4 slices of swiss cheese and topped that with a can of sauerkraut.  I topped that with another layer of corned beef, drizzled in mustard, and another 4 slices of swiss cheese.
I then spread out the rest of the batter on top and sprinkled with some more caraway seeds.


I popped this in a  400* oven for 35 minutes.
It came out looking like a beautiful crusty loaf of bread!

I think I might like to try this with a rye flour or maybe rye seeds rather than caraway seeds, although I do like caraway with kraut.


I sliced this up and it was like eating a stuffed biscuit.
Delicious corned beef and kraut cooked right in the bread. I served this with horseradish and thousand island dressing. YUMMY!

GRANNY'S KITCHEN: Top O'the Morning Pancakes

I love make fun foods for the kids -- even though they are practically all grown now.  I found this fun pancake recipe HERE at Betty Crocker! 
This gives me a legitimate reason to pick the marshmallows out of the Lucky Charms Cereal!!
BUT, one local store actually sells the marshmallows in bulk, so I try to keep a jar on hand.  This is just another good excuse to buy them.

You start with 2 cups baking mix (I use the mix from Aldi's if I haven't made my own in a while)
and add a cup of milk, a teaspoon each of green food coloring and vanilla.  Whisk in two eggs and 1/2 cup marshmallows from the cereal.  Next time, I'm going to add a tablespoon or two of honey or sugar to sweeten these up a bit.. The web site recommends topping with whipped cream and additional marshmallows. I will have to do that next time.  This time, I topped with syrup and bacon!  This made a fun, easy St. Patrick's treat!


Monday, March 12, 2012

GRANDMOTHER'S SEWING ROOM: Minnie Mouse Skirt

 I bought Baby Kay a Minnie Mouse doll and just happened to find some red polka-dot material in my stash.  I whipped up a little skirt to match the doll!

Aunt Marge had a piece of black velvet ribbon that was perfect for a bow for the front.

When Naomi dressed Kay, she put a black belt on.  It didn't quite stay.


 I had taken some better pictures before I realized that I didn't have my memory card in the camera! UGH..
By then, she was getting antsy, and was unwilling to pose.

This is the best photo of the skirt and bow.  I put the bow on with a safety pin so it could be taken off to wash.  The belt is from another outfit, but did look good until it slipped.


And here she is rocking with her Minnie Mouse doll.